Super Soil Microbial Life: Types, Threats & How to Boost

super soil microbial life

The base structure of super soil exists through microbial life. The small life forms in the soil convert organic substances into absorbable nutrients for plants. The list of soil microorganisms contains bacteria along with fungi, protozoa and actinomycetes. Bacterial decomposition of organic substances produces nitrogen as a result. The fungal networks specify access channels which enable roots to acquire water and nutrients. Protozoa consume bacteria through their feeding process and produce available nutrients as their waste. The microbial group known as actinomycetes aids in decomposing challenging organic substances. The interaction of these organisms shows a strong living system beneath the ground. The microscopic activity in soil provides natural health benefits to plants. Supersoil requires extensive microbial variety to sustain equilibrium, fertility and strength through time instead of artificial chemicals.

Table of Contents

Types of microbial life

What are the Types of Microbial Life in Super Soil?

Here are the 4 types of microbial life that are found in super soil:

  1. Beneficial Bacteria
  2. Fungi and Mycorrhizae
  3. Actinomycetes
  4. Protozoa and Nematodes

Beneficial Bacteria

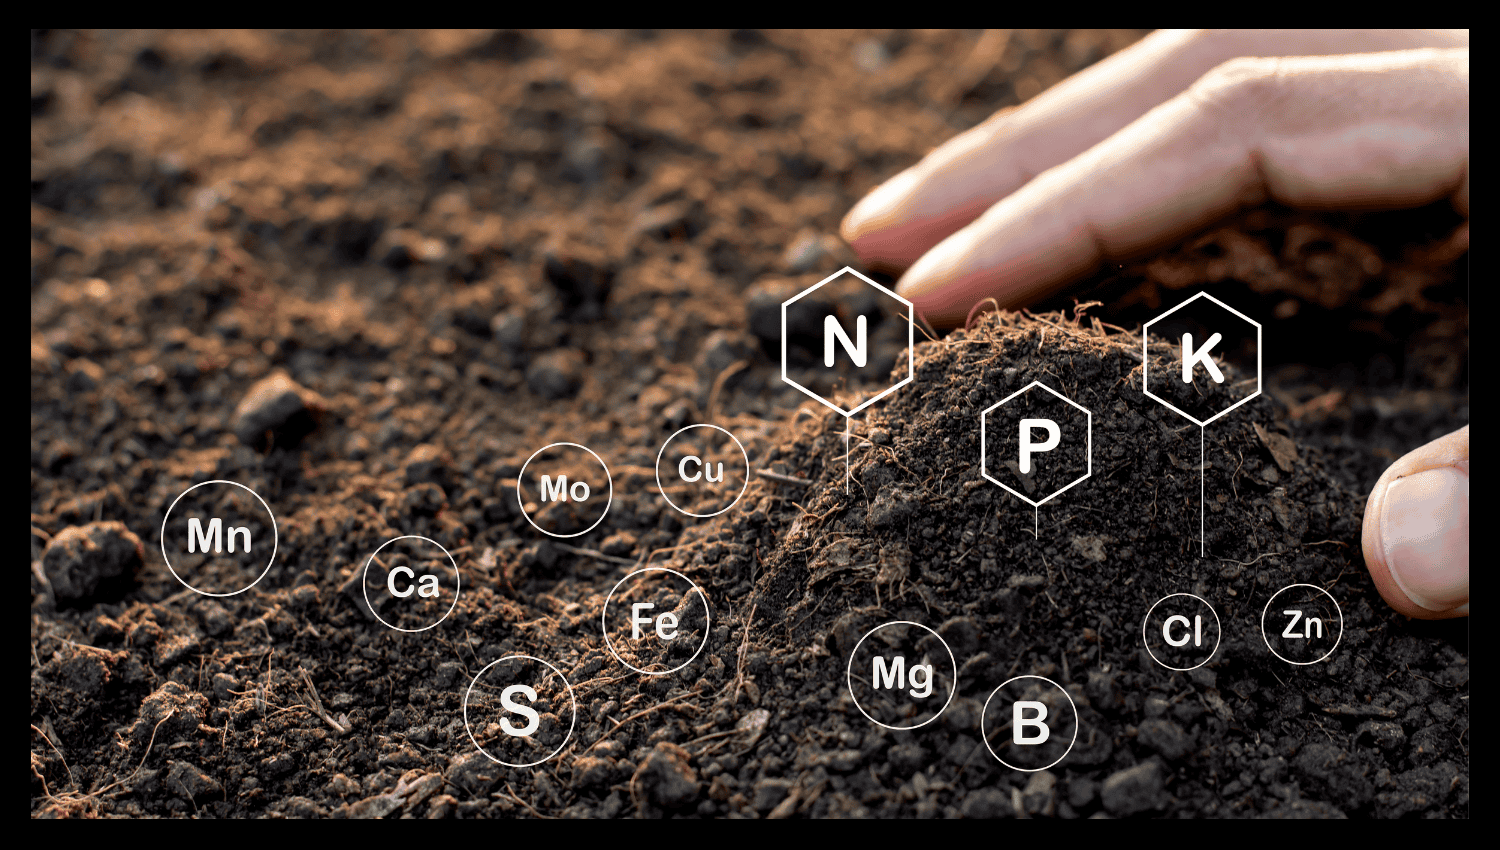
Beneficial bacteria help in nutrient cycling and nitrogen fixation. The bacteria develop disease protection mechanisms within plants. A bacterium called Rhizobium and another called Azotobacter fix atmospheric nitrogen into the soil. The beneficial strain known as Bacillus subtilis serves to protect plants against infections. The soil receives continuous support from beneficial bacteria, which activate nutrients and promote organic-based plant health improvements.

Fungi and Mycorrhizae

Fungi, along with mycorrhizae, increase phosphorus absorption and lead to enhanced root extension area. Plants develop extensive structures which link their root systems to obtain nutrients at remote locations. The arbuscular mycorrhizal fungus Glomus intraradices develops robust soil frameworks that improve its structure. The application of fungi ensures healthy soil conditions along with increased plant adaptation. Root partnerships between these microorganisms lead plants to thrive with better yields and without requiring synthetic fertilisers.

Actinomycetes

The microorganism Actinomycetes exists between the bacteriological organisms and the fungal groups. The organisms efficiently decompose difficult organic compounds found in cellulose and lignin. These microbial organisms generate antibiotics that naturally control soil-damaging pathogens. The large population of these beneficial microorganisms helps the soil gain important vitamins and minerals. The ecosystem of super soil flourishes through Actinomycetes, which in turn enhances plant development and leads to balanced soil environments.

Protozoa and Nematodes

The soil food web relies critically on protozoa, together with nematodes. Bacteria and fungi become their dietary source as these microorganisms break down nutrients into forms that are available for plants. The moving activities of these microorganisms help aerate the soil while they maintain a balance between the microorganisms present. These microorganisms regulate living populations in the ground, which results in optimised nutrient cycles that enhance plant root habitats.

Super soil microbial

How to Boost Microbial Life in Super Soil?

The following are the 4 ways to boost Microbial life in super soil:

  1. Compost and Worm Castings
  2. Using Organic Amendments
  3. Compost Tea and Microbial Inoculants
  4. Moisture and Aeration Practices

Compost and Worm Castings

Worm castings, together with compost, serve as excellent sources for beneficial microbes. These materials provide the perfect foundation to develop Super Soil enriched with diverse microorganisms. The breakdown of organic materials in compost creates agricultural nutrients abundantly. Soil fertility and microbial diversity receive improvements from worm castings in the soil. The use of these ingredients generates efficient soil ecosystems to help plants develop better health.

Using Organic Amendments

Natural supplements such as kelp meal, together with fish hydrolysate and molasses, serve as organic nutrients that encourage beneficial soil microorganisms. The mineral content in kelp meal comes with multiple plant hormones for plants to use. Fish hydrolysate delivers strong nitrogen content to the soil. The simple sugar content in molasses enables quick microbial metabolism. The amendments enable effective microbial function to maintain soil nutrients while they improve general soil health without using artificial fertilisers.

Compost Tea and Microbial Inoculants

The process of composting tea produces more beneficial microbes by brewing compost with water. The aerobic process of tea suspension promotes the multiplication of microbial populations. After brewing, the solution becomes ready for use in applying it directly to plants or spreading it across the soil to promote microbial activity. Growing soil life through microbial inoculants requires the use of bacteria and fungi powders. These two techniques build thriving microorganisms in soil, which results in robust vegetation.

Moisture and Aeration Practices

The survival of microbial life depends on proper soil moisture levels, together with sufficient aeration conditions. Soils that stay moist sustain the active phases of microbes. The existence of both dryness and excessive moisture endangers microbial populations within the soil. The presence of good soil aeration enables essential oxygen availability required by microbial cells for their respiratory processes. Soil structures that are light and crumbly create conditions which retain water while allowing airflow to succeed, thus showing biological equilibrium.

What are the Common Threats to Microbial Life in Soil?

These are the 3 most common threats to microbial life:

  1. Overuse of Synthetic Fertilisers and Pesticides
  2. Soil Dry-Out or Waterlogging
  3. High Soil Compaction

Overuse of Synthetic Fertilisers and Pesticides

The application of synthetic fertilisers together with pesticides generally results in harm to beneficial soil microorganisms. Chemicals disrupt natural nutrient cycles. The number of different microorganisms in the soil becomes lower, which weakens the entire ecosystem. The death of important bacterial and fungal populations negatively influences plant health. Organic soil requires a precise microbial balance between all its different species. Extreme synthetic product usage results in permanent harm to the soil’s biological mechanisms for supporting strong plant development.

Soil Dry-Out or Waterlogging

High or low water content in soil threatens the survival chances of microorganisms. The dry nature of the soil activates microbial inactivity or leads to their death. The lack of oxygen entering the waterlogged landscape causes death by suffocation to aerobic microbial life. The right levels of soil moisture allow microorganisms to function actively within their communities. The proper drainage features in soil help avoid dryness and flooding at the same time. A healthy soil environment requires the right balance of moisture to ensure continuous microbial activity and healthy soil.

High Soil Compaction

The process of compaction in soil restricts the necessary air circulation required for microbial respiration. The survival of helpful microorganisms depends on an adequate oxygen supply. Harmful bacteria multiply more quickly when soil lacks oxygen, while being anoxic. When packed soil exists, it slows down root development and inhibits materials from recycling. Soil density that remains loose produces better conditions for both microorganisms and plant growth systems. The adjustment of soil texture leads to better air circulation, which develops a necessary environment for living soils.

Super Soil NPK: Ratio, Symptoms & Test

Super soil Npk

NPK refers to Nitrogen (N), Phosphorus (P), and Potassium (K), three primary macronutrients that are essential for plant health. Nitrogen enables leaf formation while providing a deep green colour to plants. Phosphorus helps plants build strong roots while also advancing their flowering and generating fruit. Plants benefit from potassium since it enhances their structure while increasing disease resistance. Plants need these nutrients to a greater extent than other minerals do. The right equilibrium of NPK nutrients leads plants to experience rapid development and solid reproductive outcomes, together with resilience against stress. When any nutrient is either insufficient or excessive in amount, plants show reduced performance. Super soil derives constant NPK nourishment through the use of natural amendments such as compost, bone meal and kelp meal. The correct balance of nutrients in living soil systems sustains the ecosystem communities while delivering sustainable plant nutrients for growth.

Table of Contents

What is The Role of NPK in Super Soil?

NPK occurs naturally in Super Soil through the organic combination of compost with worm castings and organic additives. Plant materials that decompose together with animal manures and mineral additives provide nitrogen, phosphorus and potassium to super soil. The availability of nutrients extends over time due to the presence of organic matter. 

NPK functions as a unit with peat moss and microbial life to develop a sustainable ecosystem which continuously supplies nutrients to plants. Worm castings coupled with compost help the soil release nutrients at appropriate times while supporting excellent root health. Supersoil establishes self-preservation through balanced ingredients in its composition. The nutrient system maintains fertility through natural means by serving the long-term nutritional requirements of vegetables, flowers and other crops that grow in organic living soil.

super soil npk ratio

What are the Ideal NPK Ratios for Super Soil?

The ideal NPK ratios for super soil can be categorised into 3 groups:

  1. For Vegetative Growth (Leaf and Stem Development)
  2. For Flowering and Fruiting
  3. Common NPK Ratios for Various Plants

For Vegetative Growth (Leaf and Stem Development)

The development of healthy vegetation depends on a sufficient supply of nitrogen (N). Plants develop their strong stems together with their lush green leaves because of a sufficient nitrogen supply. Plants develop strong structures due to high soil nitrogen content. The fundamental mineral elements develop from compost materials combined with worm castings and natural amendments. Healthy plant growth occurs when proper nitrogen levels exist, as they produce plants with colourful foliage that develop rapidly and become denser.

For Flowering and Fruiting

Flowering development alongside fruiting requires high concentrations of phosphorus (P) and potassium (K). The presence of phosphorus leads to better root development and bigger flower blossoms. The addition of potassium leads to superior flower development, together with enhanced quality when it comes to fruits. Soil receives helpful nutrients through organic combining formulas that include bone meal together with kelp meal. Plants become fruitful and vibrant when their P and K levels remain balanced, which produces strength and great growth.

Common NPK Ratios for Various Plants

Plants have various optimal ratios that they require for NPK nutrition. During the growth phase, Cannabis requires 3-1-2 levels of NPK nutrients, but it needs 1-3-2 ratios for optimal flowering development. When growing tomatoes, it is best to apply 5-10-10 fertilisers for improved fruiting performance. The best fertiliser choice for flowers includes either 10-10-10 or any balanced fertiliser mixture. The super soil recipes complete this natural process. Organic agricultural systems use nutrient supplies which do not rely on chemical fertilisers, hence supporting consistent, healthy crop production throughout different plant varieties.

How to Balance NPK in Your Super Soil?

The following are the 3 ways to balance the NPK ratio in your Super Soil:

  1. Ingredients That Raise or Lower NPK Levels
  2. Creating Custom Super Soil Mixes Based on Plant Needs
  3. Adjusting NPK Based on Soil Test Results

Ingredients That Raise or Lower NPK Levels

The use of organic amendments automatically changes the NPK content in super soil. Fish meal, blood meal, and alfalfa meal increase nitrogen for leafy growth. Bone meal, fish bone meal, and rock phosphate boost phosphorus for roots and blooms. The combination of Kelp meal, greensand and wood ash functions to increase potassium content, which in turn strengthens plants. All the ingredients together deliver nutrients to plants while keeping the system free from chemicals.

Creating Custom Super Soil Mixes Based on Plant Needs

The nutritional requirements for various plants vary from each other. Plants of the Cannabis genus require higher concentrations of both phosphorus and potassium at the flowering stage. Plants such as leafy vegetables require extra nitrogen in their soil because it produces rich green foliage. Custom super soil mixes unite compost together with meals and minerals to fulfil specific plant needs. A well-balanced recipe helps plants develop their roots, stems, flowers and fruits during different stages of growth.

Adjusting NPK Based on Soil Test Results

A professional soil testing method provides the same nutrient measurement results. The results of testing enable the analyser to detect nitrogen, phosphorus and potassium imbalances in the soil. Laboratory results enable the assessment of organic matter and mineral amendments as treatments for nutrient imbalances. Soil analysis through testing maintains the health of productive soil. A proper balance of nutrients in the profile allows plants to obtain all necessary elements from their natural living soil surroundings.

What are the Symptoms of Nutrient Imbalance (NPK Deficiency or Excess)?

The following are the symptoms associated with nutrient imbalances, including deficiencies or excesses of NPK.

  1. Nitrogen Deficiency Symptoms
  2. Phosphorus Deficiency Symptoms
  3. Potassium Deficiency Symptoms
  4. Symptoms of Excess NPK

Nitrogen Deficiency Symptoms

Plants with nitrogen deficiency usually display yellow leaves that start with older foliage. The growth of plants slows and weakens. Plants appear dull and thin. The colour change in new growth occurs rapidly along with its reduced size. Without enough nitrogen, overall health decreases. These symptoms appear when the soil consists of either poor organic material or inadequate compost levels. Quick action enhances the recovery process.

Phosphorus Deficiency Symptoms

A shortage of phosphorus influences both the root system’s power and its growing capabilities. Plant growth happens at a reduced rate, and stems become weak. New leaves might display colours from dark green through to purple when phosphate supply levels are low. Flowering and fruiting become poor. The presence of phosphorus enhances plants’ capability to maintain effective energy transfers throughout their systems. A combination of cold temperatures and phosphorus-poor soils normally produces these symptoms. The right organic supplement, including bone meal, helps plants reach equilibrium.

Potassium Deficiency Symptoms

A potassium deficiency weakens plant stems and causes the leaves to hang. The edges of the leaves develop yellowing, followed by browning. The reduction of fruit and flower output occurs dramatically. The resistance of plants to drought and other stress factors remains at low levels. Plants gain increased cellular strength through potassium, which supports their basic structure. The lack of potassium results in weak, small-dimensioned plants. Organic kelp meal serves as a natural organic potassium source for crops.

Symptoms of Excess NPK

The excessive application of NPK causes leaf burns, which ultimately leads to plant stress. Their tips become brown and curl. Water absorption becomes impossible when roots become dry. Plant growth stops entirely because of the nutrient lockout that develops after NPK fertilisation. Over-fertilisation damages soil health. The moisture content in the soil becomes insufficient to prevent leaves from wilting. Proper management of organic amendments safeguards both the accumulation of excess materials and preserves the original balance of super soil.

How to Test NPK in Your Super Soil?

The following tools and methods are important in testing the NPK ratio in your super soil:

  1. Tools for Testing NPK
  2. Interpreting Soil Test Results

Tools for Testing NPK

Homeowners can easily perform NPK assessments of soil through the use of portable test kits, which show nutrient concentrations. The tool shows nutrient contents through changes in colour, including nitrogen, phosphorus and potassium. The measurements performed by professional testing services offer complete results. Professional services conduct laboratory analysis for nutritional values, together with measurements of soil pH levels. Simple equipment combined with professional laboratory capabilities helps users to effectively check soil health, along with nutrient requirement,s frequently.

Interpreting Soil Test Results

The testing results produced by soil examination show how high or low the levels of nitrogen, phosphorus and potassium appear. The assessment results are presented through coloured code systems also with corresponding charts. Your understanding of test results allows you to determine appropriate organic additions for maintaining soil equilibrium. The analysis of these laboratory outcomes leads to successful plant development. The combination of regular testing alongside careful reading ensures that super soil remains nutritious while continuing to succeed.


Super Soil pH: Range, Symptoms & Test

Super soil ph

Soil pH is the measurement that represents the soil’s acidity or alkalinity scale extending from 0 to 14. Soil maintains a pH of 7 as its neutral point on a scale which ranges from acidic values below 7 to alkaline values above 7. A soil’s pH rating determines the way plants obtain their nutrients. Many nutrients become unavailable as soil reaches extremely acidic or alkaline levels. The existence of microorganisms relies on proper pH conditions. A suitable environment for healthy bacteria exists between acidic and neutral conditions of the soil. A suitable pH balance enables the natural cycle of nutrients for organic systems. It keeps the ecosystem healthy. The proper management of pH levels produces stronger vegetation. Soil with the correct pH level supports better nutrient availability and enhanced microbial activity within the soil environment.

Table of Contents

What is the Ideal pH Range for Super Soil?

The highest quality for super soil exists when its pH measures between 6.2 and 6.8. Most plant roots can access nutrients that remain accessible within this specific pH range. The pH of soil reaching 6.2 or 6.8 degrees causes essential nutrients such as calcium and magnesium to become inaccessible through blockage. 

A change in pH towards alkaline levels makes iron and phosphorus unavailable for plant roots. The pH level at which plants such as cannabis and vegetables function optimally falls between 6.2 to 6.8 on the pH scale. The soil develops yellow leaves as growth slows. Different plants show different reactions to soil pH, but most execute their best growth within a neutral range. Maintaining super soil at this pH level prevents nutritional blocking while enabling the soil to provide a habitat for thriving microbial activity.

super soil ph range

How Super Soil Naturally Buffers pH?

The organic matter content in super soil provides natural pH buffering because of its multiple components. The combination of compost and worm castings and dolomite lime and peat moss additives maintains a stable pH environment for the soil. The mineral release process from these materials creates a slow acid-base equilibrium. Microbial breakdown of organic materials uses natural compounds to execute pH regulation as part of their biological function. Living microorganisms located in healthy populations maintain nutrient cycles in the soil. 

Soil pH stability depends directly on the water quality. Soil pH gradually changes when you use water with high mineral content or excessive chlorine treatment. The use of freshwater that maintains equilibrium supports super soil in regulating optimal pH conditions required by plants and their microorganisms.

Symptoms of pH Imbalance

The symptoms that indicate pH imbalance become apparent in plant structures. Main physical indicators of pH imbalance include yellow leaf-coloured foliage and brown edge damage, in addition to impaired nutrient absorption. Plants show poor root development symptoms through weak and thin roots that display a discoloured appearance. Soil compounds cannot effectively absorb nutrients when root health suffers due to poor conditions. 

A pH imbalance shows too little growth because plants develop into smaller sizes while producing fewer blooms. Plant blossoms present a weak form and abnormal shape. An abnormal soil pH produces visible symptoms that indicate the pH range deviates from its optimum parameters. Poor plant health stems from ignored pH problems, which gradually become worse. Soil pH monitoring at regular intervals keeps problems both obvious and subtle from appearing on plants.

How to Test pH in Super Soil?

The evaluation of super soil pH requires basic testing procedures. The accurate measurement of soil acidity and alkalinity can be achieved through a combination of soil slurry tests, together with pH meters and leachate testing. To measure soil acidity, you combine test water with distilled water in a slurry mixing process. You can get rapidly displayed numerical results through the use of a pH meter. The evaluation of water runoff depends on proper leachate testing procedures. 

The most suitable moment to perform testing occurs right after supplying water, so the soil becomes thoroughly moist. Self-made testing equipment suits home gardeners for quick assessments, but laboratories offer comprehensive breakdowns of results. Routine testing operations help maintain constant pH levels. Regular measurement of the soil allows both the conservation of nutrients and better soil conditions while requiring minimal maintenance. Selecting a methodology for testing is determined by the available budget, time requirements and accuracy requirements.

How to Adjust pH in Super Soil?

Super soil adjustment requires natural methods to change its pH level. Supersoil pH reduction requires gardeners to execute peat moss or elemental sulfur additions. The methods for increasing pH include applying dolomite lime, wood ash and crushed oyster shells. The organic system effortlessly accepts these amendments that protect microbial life from damage. Organic gardeners stay away from chemical solutions since they destroy the life present in living soils. A sustainable working duration of natural materials contributes to the health of the soil ecosystem. 

A stable pH in super soil develops from maintaining much organic matter, together with lively microbial populations and balanced applications of compost. Soil stability from worms and minor chemical amendments helps in managing normal changes in pH values. Soil structure that is in good health makes nutrients accessible for plants to grow robustly until periodic management becomes necessary.

Super Soil: Definition, Ingredients & Properties

Super soil definition

Super soil represents a specially designed fertiliser mix which provides complete plant support from seed to harvest without the need for supplemental nutrients. This mixture includes compost and worm castings together with natural additives and beneficial microorganisms. The complete nutrient supply of super soil differs from traditional potting mixes that need periodic liquid feeding. The natural framework of super soil enhances both soil quality and plant growth strength. The combination of nutrients in super soil has made it popular among organic growers since they prefer natural cultivation methods without chemicals. The primary difference between traditional potting mixes and super soil involves drainage and texture compared to complete nutrient content and biological life, which enable self-maintenance for exceptional plant development.

Table of Contents

What are the Key Ingredients in Super Soil?

The key ingredients in super soil can be categorised into 4 groups:

  1. Base Components
  2. Amendments
  3. MacroOrganisms
  4. Microorganisms

Base Components

Here are 5 types of base materials used in super soil:

  1. Compost
  2. Peat Moss
  3. Coco Coir
  4. Worm Castings
  5. Topsoil

Compost Types

Compost

The compost consists of organic matter that has decomposed and is rich in nutrients. Soil structure receives benefits from compost, which also raises microbial activity and enhances water retention. Gardeners implement compost as a natural plant-feeding method to substitute synthetic chemical fertiliser products. People use organic kitchen waste together with leaves and grass clippings to produce compost, which creates a green solution for creating healthy soil that produces better yields.

Peat Moss

Peat bogs serve as the natural habitat for collecting the organic material known as peat moss. This material keeps water successfully with outstanding results, and it assists heavy soils by becoming lighter, which supports root growth. The acidic nature of peat moss suits plant species requiring soil environments with decreased pH values. The soil aerates through worm activity, which results in reduced compaction and develops stronger plant health.

Coco Coir

Coco coir is made from the fibres found in coconut husks. This natural material is produced from the outer husk of coconuts. The material efficiently retains moisture and improves air circulation through the soil without experiencing structural collapse. This natural substance shows three beneficial properties through its neutral pH balance and resistance to bacterial and fungal growth, while also being sustainable. Gardeners normally add coco coir to their potting mixes because it creates lightweight spaces which retain water effectively for seeds and plant placement.

Worm Castings

Worm castings develop when earthworms produce their nutrient-filled waste substances. The natural breakdown of decomposing earthworms adds essential mineral nutrients of nitrogen and phosphorus, and potassium to soil. The application of worm castings enhances both soil texture quality and improves water maintenance, and plants become more resilient. Organic gardeners strongly value this organic fertiliser because it enhances microbial activity, together with root health.

Topsoil

The top layer of soil, called topsoil, contains numerous nutrients and organic content. This layer supports plant development through its assistance to root growth, combined with its support for microbial populations. Topsoil with excellent quality features capabilities for proper water drainage while maintaining sufficient water content. The product serves essential functions during landscaping operations and in gardening work, and in lawn development activities.

Amendments

The following are the 7 types of Amendments that are used in super soil:

  1. Bone Meal
  2. Blood Meal
  3. Fish Meal
  4. Bat Guano
  5. Kelp Meal
  6. Rock Dust
  7. Dolomite Lime

Bone Meal

The manufacturing process of bone meal as a slow-release fertiliser begins with animal bone grinding. Bone meal functions as a fertiliser that contains abundant quantities of phosphorus and calcium to promote both roots’ healthy development and flowering abilities. There are two principal uses of bone meal in organic gardening since it enhances the structure of the soil while building up plant health through the development of sturdy stems and colourful blooms.

Blood Meal

Blood meal serves as a fertiliser for plants because it contains abundant amounts of nitrogen in dried animal blood form. When applied to the ground, the substance promotes lush foliage and creates intensely green-colored leaves for plants. Soil fertility benefits from using blood meal, which specifically enhances the growth of plants requiring elevated nitrogen levels. The quick response time of this fertiliser makes it ideal to use on depleted soils, where it delivers rapid growth enhancement for plant development.

Fish Meal

The agricultural industry produces fish meal through the grinding process of fish remains into a natural fertiliser. The fertiliser delivers vital soil nutrients that include nitrogen, together with phosphorus, as well as trace mineral compounds. Fish meal enables vibrant plant development while sustaining root system strength, along with maximising flowering productivity. The activity of soil microbes enhances when fish meal is present, thus plants receive better nutrient access, which produces stronger and healthier outcomes over multiple growing seasons.

Bat Guano

Bat guano represents an effective organic fertiliser containing high concentrations of nitrogen alongside phosphorus and potassium. The fertiliser originates from bat droppings collected from accumulation sites, which both nourish the soil and enhance microbial growth. Such organic fertiliser enhances both fruit development and root health, together with increased flowering capabilities. Plants receive performance-enhancing effects, furthermore environmental protection from the easy soil incorporation of this fertiliser.

Kelp Meal

The production of kelp meal occurs when seaweed is dried before grinding it into powder form. Because of its composition, kelp meal provides trace minerals along with growth hormones and enzymes that make plants healthier. Checking plants with kelp meal strengthens root systems while boosting their resistance to environmental stress and leads to improved plant life. Plants thrive better because kelp meal enhances soil structure and increases water retention while providing an organic method to feed plants naturally.

Rock Dust

The application of volcanic rock dust in its finely crushed form provides many soil minerals because it reintroduces a comprehensive mineral collection into the earth. The application of this material adds necessary elements, including calcium, iron, and magnesium, to restore soil health. Plants become stronger through the use of rock dust, which helps them develop better cell structures and builds up their resistance capabilities. The increased microbial activity in soils becomes possible through rock dust application, which results in healthier conditions for microorganisms.

Dolomite Lime

The mineral compound known as dolomite lime contains both calcium carbonate together with magnesium carbonate. Using dolomite lime results in a rise in soil pH that changes acidic conditions into neutral conditions. Plant development benefits from essential calcium and magnesium, which dolomite lime contributes to the soil foundation. When applied periodically, dolomite lime enhances root strength while simultaneously providing healthier foliage, together with balanced nutrient quantities in the soil.

MacroOrganisms

Here are 3 types of macroorganisms that are used in super soil:

  1. Earthworms
  2. Insects & Arthropods
  3. Other Beneficial Macrofauna

Earthworms

Earthworms are important soil organisms because they consume decaying plant debris to produce valuable nutrient-filled castings. When earthworms dig into the ground, they create openings which enhance air availability and water penetration. The natural tilling of the soil through earthworm action leads to improved root health and soil fertility, together with enhanced plant health, which requires no mechanical intervention or chemical fertilisers.

Insects & Arthropods

The decomposition process of organic matter receives assistance from insects and arthropods, which include ants and beetles. Through their movement through the soil, these organisms create better air circulation and enhance the recycling of necessary nutrients. The decomposition process accelerates through their activity, along with maintaining ecosystem balance as they improve natural soil structure.

Other Beneficial Macrofauna

Soil ecosystems benefit from various helpful macrofaunal species, including mites as well as centipedes and millipedes. The organisms consume both dead organic substances together with small pests while providing decomposition services and pest management benefits. The ecosystem functions better because macrofauna regulates soil balance while increasing nutrient cycling, which provides nutritious living conditions for plant roots.

Microorganisms

Below are the 3 types of microorganisms that are used in super soil:

  1. Bacteria
  2. Fungi
  3. Other Microbes

Bacteria

The bacteria in the supersoil convert organic substances into simple plant nutrients through decomposition. Soil bacteria contribute to nitrogen fixation together with vital nutrient recycling functions, and they sustain the overall health of the soil environment. When beneficial bacteria tie themselves to plant roots, they build stronger container roots that defend plants against natural diseases while making roots healthier.

Fungi

Mycorrhizal fungi, together with other fungi, create extensive networks which allow plant roots to collect additional water and nutrients. The organisms break down complex organic substances to release the necessary mineral nutrients, which plants need to thrive. The presence of fungi inside soil provides root protection against diseases while simultaneously offering drought resistance and improved support to the overall structure of the soil environment.

Other Microbes

Actinomycetes and protozoa, together with other microbes, function to enhance soil quality by decomposing organic materials and restraining damaging organisms. These microorganisms release nutrients from unavailable sources by enriching biological life while keeping all underground systems in balance. They produce ongoing biological processes which create a growing medium that becomes healthier and productive, and richer in quality.

What are the Properties of Super Soil?

The following are the 7 major properties of Super Soil:

  1. pH Level
  2. Nutrient Composition (NPK)
  3. Microbial Life
  4. Texture
  5. Water Retention
  6. Aeration
  7. Organic Matter Content

pH Level

The pH value of Super Soil ranges from 6.0 to 7.0, which functions optimally for almost every plant species. The benefits of this balanced condition make it possible for plants to take in nutrients and maintain proper microbial operations. Healthy mineral absorption happens when plants operate within the proper pH range because this condition prevents essential mineral lockout. A proper soil pH range from 6.0 to 7.0 enables both strong plant health and nourished biological functions within the soil ecosystem.

super soil npk ratio

Nutrient Composition (NPK)

Super soil beneficially distributes three essential plant nutrients, nitrogen (N), together with phosphorus (P) and potassium (K). The primary nutrients help plants develop strong aboveground parts and robust roots while enabling successful flowering. The mixture contains essential micronutrients as well as NPK nutrients. The stable nutrition levels from this release system make chemical fertilisation unnecessary by supporting plant health at every development phase.

Super soil microbial

Microbial Life

Super soil teems with beneficial bacteria, fungi, and other microorganisms. The microbes transform organic materials into compounds which plants can take up nutrients from. Active microorganisms activate better soil health while giving plants disease resiliency and efficient nutrient recycling capability. Super soil receives its sustainable fertility quality from the microbial community that drives healthy natural plant development.

Texture

Super soil has a soft, loose texture, which enables roots to break ground effortlessly. The mix of both fine and rough materials in super soil creates an optimal structure which prevents soil reduction and enables the right water and air movement. Excellent soil texture enables plants to develop powerful root networks, which improves their ability to absorb nutrients, together with their capacity to survive adverse environmental conditions in weak soils.

Water Retention

Supersoil contains enough water reserves to support plant growth while avoiding saturated conditions. Super soil contains organic ingredients, including compost, together with coco coir that enhances water retention in the soil without creating waterlogged conditions. A properly balanced water content allows roots to maintain consistent moisture levels, which protects crops from drought stress and helps them grow better and disease-free.

Aeration

Super soil maintains perfect air circulation, which is fundamental for proper plant and microbial development. The incorporation of perlite or pumice creates air pockets which spread throughout the soil. The oxygen needs of roots become possible with good aeration, which enhances nutrient acquisition as it supports a healthy microbial ecosystem. Plants develop into strong, fast-growing entities with better strength when the soil provides proper air circulation.

Organic Matter Content

Super soil receives its organic substance from compost alongside worm castings and decomposed plant waste. Beneficial soil microbes receive nutrients from organic matter while they also work to develop soil structure and deliver nutrients at a controlled pace. Soil fertility is strengthened by high organic matter levels and improved water retention and air circulation. It produces a self-sustaining flourishing garden system for plants to flourish naturally without chemical additives.

How to Grow Niche Strain at Home? Why Home Grow is Best?

Niche Strain

Growing niche strains of weed can be rewarding for enthusiasts and those who want unique varieties. Niche strains differ entirely from those most people use because of their smell, effects, and growth challenges.

Growing unique types of cannabis at home lets you discover many different sorts of marijuana plants. From exotic tastes to rare genes, these strains can increase your experience of growing plants and help you gain knowledge of cultivation.

Nowadays, people mostly grow niche strains. They learn and use new skills to grow appropriate niche weed strains at home. These sorts of weed strains have benefits, which will be discussed in this blog.

What is a Niche Weed Strain?

The word niche refers to something that fits a person’s needs or wants. This word can be used in various ways. In terms of cannabis, a strain that is produced or used to satisfy a specific need or preference is known as a niche weed strain. The needs or preferences for weed strains involve levels of THC or CBD, flavor, smell, and other conditions related to growing.

These strains have been growing to provide desired characteristics for a particular consumer and satisfy market demand. Because there are fewer available strains, the chance of finding niche strains is lower than that of mainstream strains. Still, these strains are considered more critical for fanatic growers who like their unique capabilities.

Niche Strain at Home

Steps to Grow Niche Strains at Home

The steps for growing strains are mentioned below:

1. Research

Before choosing a particular strain, investigate a strain that is suitable for your needs and can adjust its growth according to the environment. Consider its genes, growing characteristics, desired effects, etc.

2. Choosing the Seed

After selecting a particular strain, obtain the seeds from reputable sources. Aim for a specific store or website that can provide high-quality seed genes. These strains are less available and hard to find, so be prepared to search the seeds rigorously.

3. Growing Environment

Check and set up a growing environment according to the necessities of selected strains. When setting up the environment, consider requirements such as lighting, humidity, temperature, etc., for appropriate growth.

An indoor setup offers better control over the conditions of an environment, while growing plants outdoors can be necessary, depending on your local climate conditions.

4. Germination

Use your desired method, such as a paper towel, to develop seedlings or utilize the growing medium for planting. Check whether the seeds receive enough moisture, warmth, and oxygen.

5. Vegetative Growth

Ensure that the seedling receives a proper light cycle during the vegetative stage after germinating. Set up a daily timetable for checking nutrients and water levels. Once the plant has commenced growing, transfer it to a large container.

6. Flowering Stage

Set the light cycle to 12 hours of light and the rest of the hour in a day to darkness to convert your plant to the flowering stage. Each strain has a different flowering time, so follow the timetable carefully. In this stage, it is essential to check the level of nutrients and to provide support for heavy buds if needed.

7. Harvesting and Curing

Once the plant has completely grown, you are ready to harvest. The timing can be different depending on the strain and desired effects. Once the plant has been removed from the soil, trim the buds and hang them in a dark and well-ventilated spot. After they have dried, store them in a glass jar to improve the fragrance and flavor.

Niche weed Strain

Why Niche Strains Home Grow are Best?

There are a few advantages of niche strain for growers mentioned below:

Unique Characteristics

These strains have flavors, fragrances, and effects that differentiate them from typical strains. This unique strain can give the consumer a new, exciting experience and sensation.

Targeting Effects

Several strains are grown to provide relaxation, pain relief, etc. These effects can make it easy for the consumer to select a strain based on subjectivity.

Medical Applications

A strain can treat disease by healing, which makes it helpful in managing medical conditions. For example, high levels of CBD can reduce inflammation, anxiety, and pain, which is why most people find it for this purpose.

Importance in Terms of Region and Culture

A niche strain possesses cultural and regional importance, showing traditional and indigenous varieties of cannabis from particular geographic areas. Preserving and nurturing these strains can help protect the cultural heritage and variety within the marijuana plants.

Conclusion

Growing niche weed strains at home require an effort that allows fanatic growers to experience different flavors, fragrances, effects, and growing techniques.

High-quality marijuana can satisfy needs and preferences by choosing seeds wisely, adjusting the environment for favorable growth, and adhering to best practices throughout the growing process. Each step offers experimentation, learning, and refinement opportunities, from research and seed selection to harvesting and curing.

How to Grow Indoor Garden in a Tent Instead of a Greenhouse?

indoor garden

A grow tent is the best option for growing fresh plants in a specific area. Different areas, such as the basement, garage, or closet, can be used as indoor gardens. Any empty place in the house can also be helpful for this purpose.

This makes it easy to grow plants without any interruption. Before proceeding with the steps for growing an indoor garden in a tent, it is essential to know the basics of a tent for growing plants and a greenhouse/tent greenhouse.

What is a Grow Tent?

It is a foldable object that can be used to grow plants inside that object after the tent has been opened. You can grow a garden inside the tent for the healthy growth of the plants. This is also known as a grow room. Each tent has a different size, feature, and price; you must choose the best. The tent’s interior is coated with a layer of reflective silver to maintain warmth for the plants.

What is a Greenhouse?

A greenhouse is a structure where plants are kept for growth. This structure is surrounded by walls and roofs made from glass or plastic to maintain a warm climate for the plants by bringing heat or sunlight. This is way better than the plants grown outside the house. With this regulated climate, plants can easily be cultivated.

The greenhouse can be a building, furniture, etc. A tent greenhouse or pop-up tent greenhouse is the same as a greenhouse, but the difference is the size, as a tent is mostly smaller than a greenhouse of any size.

Nowadays, people use greenhouses a lot because of their famous history. An emperor was told to eat one cucumber daily to eliminate sickness.

There were no methods for growing cucumbers, so they invented a greenhouse to grow healthy cucumbers quickly. The greenhouse was invented in Rome in 30 AD. Greenhouses were used to attract light to the plants through glass.

Tent greenhouse

Difference Between Grow Tent and Greenhouse 

Grow tents and greenhouse tents for indoor growth have the same purpose of giving a regulated environment to the plants, but there are a few things that distinguish between them:

1. Tools and Structures

A tent comprises light and thin fabric with an interior coating, enhancing light distribution to the plant for proper growth. At the same time, the greenhouse consists of multiple glass or plastics that allow the plants to tolerate outdoor conditions.

2. Size and Foldable

A tent is small but can be folded and carried efficiently. It is mainly used indoors, and sometimes, it is used outdoors in a small space. A greenhouse isn’t portable and requires a huge space to build one that is useful for outdoor plants.  

3. Controlling of Temperature

Both have the same feature of controlling temperature, but the greenhouse relies on natural ventilation. The greenhouse provides more heating and cooling to maintain plants. Fans or other temperature-related units are installed in the tent. It is smaller than a greenhouse, which makes the tent more advantageous in controlling the exact temperature.

4. Lighting

A tent uses the most LED or artificial light, while a greenhouse uses sunlight. However, any artificial light can be installed and used at night.

5. Cost

Grow tents cost less than greenhouses because of their size or any other aspect that is less than a greenhouse.

Check out our soils for plant growth

Greenhouse tent indoor

Steps to Grow Indoor Garden in a Tent

Procedures for growing a garden in a tent instead of growing a greenhouse tent indoor garden are as follows:

1. Choose Your Tent 

Select the tent that you want for a certain number of plants to be fit for growing. Check to confirm that a specific tent has good ventilation and reflective material.

2. Installing Light

Set a light that is good for plant growth. Nowadays, LED lights provide efficient energy. To prevent plants from burning, there should be an adequate distance between the lights and the plants, and the lights should completely cover the plants. By adequate distance, we mean not too far or too close to each other.

3. Fresh Air

Use the exhaust and intake fan to circulate air around the tent’s interior properly. Ensure the use of a carbon filter to abolish odors. Proper ventilation can help you maintain temperature and humidity.

4. Suitable Medium for Growing Plants

Select a suitable growing medium according to your desires or a particular plant that can be grown ideally. Look for drainage, as it will prevent excessive water from obstructing plant growth.

5. Choose Plants

Choose plants that can fit in the given space in a tent. Before selecting a specific plant, inspect the factors used in a tent, such as lighting, space, and fan.

6. Giving Adequate Water and Nutrients

Ensure that plants are watered at a sufficient amount. This can prevent overwatering. Also, give the plants enough nutrients, as excessive nutrients can result in poor growth.

7. Harvesting the Plant

Once the plant reaches the flowering stage, you are ready to harvest it. Harvesting is as essential as caring for the plants during the growing stage, so harvest properly. This will maintain the plants’ freshness and flavor.

Conclusion

Growing the garden inside the tent provides a controlled environment for the plants, regardless of the external conditions. By following the specific procedures mentioned above, you can develop healthy plants in the garden inside the tent.

Check the plants’ health regularly and adjust them if necessary. After that, ensure the plants are adequately harvested and clean the tent afterward to place more plants for healthy growth. A greenhouse or pop-up tent greenhouse is suitable for plant growth, but we recommend a tent.

HID Lights Vs LED Lights for Growing: Which is the Best?

HID Lights Vs LED Lights for Growing

Are you having difficulty selecting the right light for your room for the plants? Numerous lights are available in the market. Don’t worry about the countless growing lights in front of you; we are here to help you choose the right light for your tent by reducing the number of possibilities for selecting lights.

HID and LED lights are the two leading lights that most growers use when they have to choose the appropriate lights for the plants.

This blog will examine how these lights are built differently and highlight their unique benefits, helping you easily decide which light is best for your room. We will also provide a list of top HID and LED grow lights to simplify your decision-making process further.

What are LED Lights?

LED stands for light-emitting diode. Many chips make LEDs as a whole, known as diodes. Two different types of light use LEDs. The first is light with distinct hues within a precise, narrow color spectrum, including white. The second is light that contains white and different temperature colors, e.g., cool and warm white.

The light bulbs used in most places are an example of a second type of LED light. Humans can see different colors when combining its chips. In the modern world, the white chips of LEDs are combined with other colors (so far, red or blue is used for combination), and people use that light.

LED intensity is lower than HID, and a high-intensity discharge light for growing plants is equivalent to a few LED intensities. You can also place the LED lights close to the plants for a certain intensity. LED lights are still famous for their efficiency and use less energy than HID lights.

HID and LED lights

What are HID Grow Lights?

HID is a light with a higher intensity than other lights used for growing plants. It provides more brightness; people use it most when plants grow in certain situations. HID can be used for personal and commercial purposes.

The HID grow bulb is a typical example of HID light. The bulb uses two electrodes and a gas to give intense light. The electricity passes from one conductor to another through a gas vapor to produce such light. There are two kinds of HID grow bulbs used for plants:

1. Metal Halide Bulbs

This bulb discharges a combination of blue-tinged and white light, similar to natural light, such as sunlight. During the growing stage, this bulb is mainly used to promote growth.

2. High-Pressure Sodium Bulbs 

This bulb discharges light with a mixture of red and orange tinge. It is perfect for the flowering stage and is mainly used to develop excellent and healthy buds.

These two bulbs contain high-intensity discharge lights for growing plants. They both have the same purpose but are used at different stages of plants. The MH bulb is beneficial in the vegetative stage, while the HPS bulb is beneficial in the flowering stage.

Check out our Nutrient Shot for the plant growth process

HID Bulbs vs LED Bulbs: Pros and Cons

Determining the best way to grow light objectively takes work and effort. Determining the best light depends upon your subjectivity. Each person has different preferences, which leads to their subjectivity.

We can choose the best light subjectively according to their pros and cons. HID bulbs vs LED bulbs based on their pros and cons are mentioned below:

Pros of LED Grow Lights

The following are the benefits of LED lights:

Discharge Less Amount of Heat

Cultivators who utilize HID lights explore the increase in power bills because of the fans added to maintain temperature. Due to excessive heating by HID, farmers face a loss of crops. Experts suggest using LED grow lights when growing plants for the first time.

Good for Small Spaces

LED growing lights prevent the plants from consuming excessive heat. LED lights allow you to easily check and test different plants without harming them. Developing healthy plant growth in a small space using HID lights is hard. For this situation, LEDs are perfect as they do not have high intensity to ruin the plants.

Less Electricity Bills Consumption

Studies found that high-intensity discharge light consumes three times the electricity LED consumes. A farmer who ultimately grows the plant within twelve weeks spends less money on power bills when using LEDs.

Cons of LED Grow Lights

The following are the drawbacks of LED lights:

Harmful for Eyes

LEDs are suitable for plants, but they harm the retina’s function. This light decreases a person’s clear eyesight and causes cloudiness in the eye. Wearing goggles is the best solution to avoid these problems, especially in a grow room illuminated by LEDs. The best part is that they are cheap, and some sellers don’t charge you.

Pros of HID Grow Lights

The following are the benefits of HID lights:

Affordability

This light costs around 50 to 70 percent less than the cost of LED light. This cost makes it more affordable to use on plants for personal and commercial purposes.

Useful in Winter

Plants need heat from the sun for healthy growth. Without heat, plants can’t grow and are likely to die in the winter. HID light can solve the problems by providing high heat to keep indoor plants alive this season. HID light emits more heat than the heat emitted by LED light.

Cons of HID Grow Lights

The following are the drawbacks of HID lights:

Unsuitable in Summer Season

In the summer season, HID light providing high, constant illumination to the plants can have adverse effects, such as rotten plants and mold infestation.

Difficulty in Cleaning HID Lights

It’s harder to clean a grow room with HID lights than a grow room with LED lights. You must be careful when cleaning such bulbs, as it takes time. These kinds of grow lights contain a large metal reflector that reflects full light straight at the plants. These additional parts increase the amount of work and boring tasks compared to using LED grow lights.

Hid bulbs vs led Should I Use an HID or LED Grow Light in My Grow Room?

If you search for LED or HID lights, there are many ways to select lights for your plants. The best part for the beginner is that these two lights can’t harm your plants. After you have experienced your plants with these two lights, you can tell which is suitable for your plant’s growth and grow tent.

Just remember these two important points:

  • LED lights are likely your best choice if you are searching for specific light spectrums and flexibility.
  • HID light is recommended if you want a bright light that provides healthy growth to plants without using money.

Buy our soil to grow your plant

Conclusion

As discussed above, the debate of HID lights vs LED lights for growing indoor plants has pros and cons. Choosing the best and most suitable light depends on subjectivity because everyone has different preferences and needs.

There is no objectivity for this purpose. Both growing lights are good, but you have to investigate the advantages and disadvantages of both lights to choose the best light according to your opinion.

LED vs Fluorescent Grow Lights: Which is Better?

LED vs Fluorescent Grow Lights

If you are a new grower or gardener, you need clarification on whether to use LED or fluorescent grow lights. This article will be a one-stop shop for every possible comparison. To increase production, gardeners have devised alternatives to sunlight that provide the same effect.

Grow lights simulate the effect of natural sunlight, making it possible to grow plants indoors year-round, even during winters or days with low sunlight.

We have two types of sunlight: LED and Fluorescent. While both are effective in growing plants indoors, they have pros and cons. The first thing anyone would want to know is which is more efficient in growing plants faster and better.

The answer would be LED. But if the question is which one costs less to buy and install, then the answer would be fluorescent lighting for growing.

While this gives us an overview of the situation, the details will make your choice easier. Do note that deciding which option is better depends on your circumstances.

What are LED Lights?

This modern LED produces bright light once electricity passes through it. The process is simple: Light is released when electrons hit electron holes in the device. You can see the light intensity and have an idea of how much energy is released through it. To produce white light, you can use various semiconductors. These energy sources are relatively cheaper than fluorescent lights.

Fluorescent lighting for plantsWhat are Fluorescent Lights?

This light-emitting device is famously known for its unique duties. It also uses electricity as a energy source to produce mercury vapor glow, which later produces a covering inside the lamp glow to emit light. This device has more unique features than a regular LED bulb, so it is more expensive.

Fluorescent Grow Lights vs LED: Key Comparison

Here is how we compare fluorescent and LED lights:

Effectiveness

Fluorescent lights can produce more heat than LEDs for growing, so they must be kept at a distance from the plants. This distance lowers the impact of light. LEDs do not dissipate as much heat and can be kept close to plants, making them more effective.

Durability

LEDs are more durable than fluorescent lighting for plants, meaning they last much longer than fluorescent lights. If we talk numbers, LEDs have a 4-5 times higher life expectancy.

Energy Efficiency

This is a major concern for growers and probably the biggest deciding factor between fluorescent and LED lights. Which one uses less electricity and provides a better result? The answer is LED light. 

LED’s electricity consumption is half that of fluorescent light for producing the same energy. That means your electricity bill will be reduced to half if you switch from fluorescent to LEDs. 

Customizable

There are two kinds of lights, i.e., warm and cool. Plants require both for optimal growth. Excess or inadequate amounts of warm or cool light will result in poor plant growth.

If you choose to use fluorescent light, you will require installing a two-tube light, one providing warm light and the other providing cool light. However, LEDs offer both within the same bulb, not only increasing their effectiveness but also making them cost-effective in this regard. 

Cost

While it does appear that LEDs are more cost-effective after they are installed, their price is considerably higher than fluorescent lights. LED panels cost an average of $150-$200, while fluorescent lights cost $10 to $30. The one-time payment of buying LED lights is higher, but in the long run, it saves money on electricity bills and increases production.

With their long life expectancy, LEDs have become more cost-effective than others. But starting with fluorescent would be a safe decision if you are a new grower and tasting everything. You can switch to LEDs when you become a more serious grower.

Fluorescent lighting for growing

Smartphone Compatibility

LEDs offer the feature of being controlled through a smartphone application, which is absent in the other unless installed separately. This makes LEDs more convenient, especially in big farms. The intensity and time of exposure can be controlled via a smartphone.

Check out our soils for plant growth

Conclusion

Suppose we conclude the comparison in one paragraph. In that case, LED lights are more effective in ensuring optimal plant growth from seedling to harvest while saving money on electricity bills and lasting considerably longer than fluorescent light.

The higher initial cost is the only downside of LED lights. Still, in the long run, they make the farm more profitable and save money on electricity bills, eventually making them more cost-effective despite being expensive.

On the other hand, fluorescent lights are more affordable, making it easy to acquire them and a much more reliable UV light source.

Eventually, fluorescent lights foster healthy plant roots and promote photosynthesis. So, by no means is fluorescent lighting for plants any lesser option than LED. As stated earlier, the optimal choice between these two depends on the circumstances of the farm and the farmer.

If you are a new grower and this is your first time setting up your indoor garden, fluorescent lights will be the way to go. However, switching to LED will be more effective and profitable as the number of plants increases and you grow your farm.

What Size Grow Tent Do I Need for 4 Plants?

What Size Grow Tent Do I Need for 4 Plants

Do not get hasty when considering the importance of equipment and techniques you need for your growing space. You aim to achieve a high yield of cannabis, so you should prepare accordingly. Think about the product you want to cultivate and the perfect ways. Consider the requirements for the ideal 4×4 grow tent, how you can sustain LED light, and the right amount of plants to fit inside.

The environment has its necessities, and no one can deny that plants play a significant role. They rely upon basic growth principles and need enough space to evolve. However, it can be a bit challenging to grow plants in your house. For this reason, markets have introduced grow tents by size. This blog will discuss the grow room size for 4 plants.

What Size of Tent Does One Plant Need?

Before we jump straight onto the 4×4 grow tent, you need to understand the basic needs of one weed plant. Remember that a plant’s size depends on different factors, such as its root system and training techniques.

Here, our focus is mainly on mature plants with a space of 3 to 5 gallons, an average-sized grow bag. Each plant has a diameter of 27 to 32 cm. Usually, a full-grown plant is 16 to 17 cm wider and consumes a larger space.

Check out our gallon pots here

To avoid growth hindrance, farmers use flat space with a diameter of 43 to 49 cm (1.4 to 1.6 feet). A 2×2 grow tent would be suitable for one adult cannabis plant, considering the additional equipment needed for better growth, such as a heater, thermometer, humidifier, fans, and hygrometer.

Grow Room Size for 4 Plants

Grow Room Size for 4 Plants

To figure out the grow room size, let’s first discuss three important variables for four plants:

1. Type of Strain

It is better to know the difference between photoperiod and autoflower plants before you decide which cannabis strain to grow. Photoperiods tend to have taller plants and grow in vertical directions. They demand an area of 48×48 inches and over 6 feet tall growing tents for four plants.

Autoflower plants, on the other hand, have smaller plants, and their branches grow vertically into a 0.36 sq. meters tent. These measurements are for four weed plants.

2. Hydroponic System

Every agriculturalist needs to know the basic rules of the hydroponic system and be aware of the tent’s dimensions. An ideal tent would be 48×48 inches and have enough space to fit the grow tray and a reservoir tank. Low-stress training, aka LST, could also be performed on the plants.

Cannabis plants grown in natural spaces such as soil require less space. Four small plants usually need an area of 0.36 square meters to 24x24x48 inches to nurture them.

3. Application of Low-Stress Training

This training technique helps branches grow additional branches to maximize cannabis production. A tent should be 1.4 sq. meters and, in inches, about 48x48x80 to house four large weed plants. This way, the plants will grow horizontally rather than vertically, and the airflow will be equally distributed among all four plants.

How Many Plants Can a Grow Tent of Size 4×4 Can Accommodate?

After figuring out the basic size of tents, we can safely suggest that six small weed plants fit perfectly in a 4×4 grow tent. This will allow the plants to grow in a spacious room with better airflow, and farmers can inspect their hydration level each day. Also, cleaning the tent is much more convenient this way.

A 4×4 tent can also accommodate up to 12 small plants. However, this setup could be better, as inspecting the plants in the back row is harder. Also, male plants are more challenging to spot in a congested space.

4 4 grow tent

Things to Consider Before Choosing to Grow Tent Sizes

Here are the things to consider before choosing to grow tent sizes:

Proper Ve­ntilation

When a tent is overloaded, excessive moisture can accumulate, hindering ventilation. The bigger the tent, the better it works for ventilation and proper airflow through the foliage. Its openings let the exhaust fans manage plant odors and temperature.

Side Doors for Openness

For farmers’ convenience, tents have three sideways doors. They water cannabis plants through them and have proper checks and balances throughout their growth period. Some tents grow with zip on the outside of each wall.

The Strength of the Supporting Poles

The overcrowded tents and flowers above the limit of 6 require better ventilation and more care. As the buds mature, the plants weigh more, requiring durable poles inside the tent to hold the weight of other tools and the pressure put onto the trellis net.

Buy our super soils for the best plant growth

Conclusion

To cultivate four plants, you will need a 24x24x48-inch tent. This arrangement is a budget-friendly decision that makes it stress-free to check on every plant daily. Although skilled farmers can grow more using 4×4 foot tents, it’s just a hectic duty for a beginner.

To conclude, it’s important to know all the significant techniques and conditions for your growing tent for smooth plantation and high-yield cultivation. Although the answer to how many plants can fit in a 4×4 grow tent is still controversial, as it can be determined by the methods and types of cannabis you want to produce.

Practical knowledge is the key to it. Try things first rather than just relying on other methods. We have shared our experience in this blog for your guidance.

Grow Tent Mushrooms: Comprehensive Guide 2024

Grow Tent Mushrooms

Mushrooms may be grown at home without a tent, and beginner growers can quickly pick up a few easy habits. However, once people discover the joy of harvesting their mushrooms, they will want to learn and grow more.

It allows you to cultivate fresh mushrooms all year and gives you greater control over the developing conditions for the highest yields. This blog explains a mushroom grow tent setup, why building one on your own is right, and how to create one.

What are Grow Tent Mushrooms?

Growers use a tent for speedy cultivation, which is light in weight, easy to carry and transfer, not high in maintenance, and can provide favorable conditions for mushrooms to grow.

They are perfect for people who want to avoid creating a permanent or fixed room for cultivation but need an area larger than a simple tub. Tents allow you to control the settings where mushrooms grow as you can regulate the sunlight, temperature, humidity, and aeration, just like in smaller development spaces.

You can create your DIY canvas using wood and artificial sheeting. If you are seeking a budget-friendly space to cultivate your fruits, readymade hydroponic tents or mini greenhouses are suitable for that as they provide sufficient space and a satisfactory growing environment.

Why is There a Need to Grow Tent Mushrooms?

For domestic cultivators, a tent is a great option. Here are a few examples to justify the statement:

Affordability

Their perfect size and portability allow you to take advantage of every opportunity without spending on large, separate buildup rooms.

Transportable Nature

They are portable and can be assembled to be transferred to any place. Their easy access allows you to prepare it in less than 24 hours. Their sizes vary from compact to large depending on your needs so that they can be easily chosen.

Variety of Sizes

Another perk is that it’s foldable and can fit in any space, from tight areas such as basements and closets to larger grounds.

Have Ducting and Electrical Ports

These ports are installed as a ventilation system through tents. Fans, humidifiers, and temperature sensors are essential for regular checks and balances.

mushrooms growing setup

Steps to Consider for Mushroom Grow Tent Setup

The first step in the mushroom development process is selecting the species of mushroom you want to grow. Popular choices include button, shiitake, and oyster mushrooms; each has specific growing needs and ideal conditions. Before deciding, consider your preferences, the available area, and the environment you wish to grow in.

The following are the steps to keep under consideration while growing mushrooms in a tent:

1. Choose an Ideal Place to Grow

Keep your mushrooms away from direct sunlight, as excessive heat can hinder their growth. An empty room or a basement would work just fine.

2. Gather Tent Frame

You can make a DIY frame for your tent out of PVC pipes. All you need to do is cut the pipes and connectors according to your design.

3. Keep the Frame Under Shelter

Protect your DIY frame with plastic sheets. Make sure there are no gaps or openings.

4. Set Up Shelves

You can adjust some shelves in your growing tent to accommodate your abundant plants. You can also make these at home with plastic or metal. Try avoiding wood, as it is not suited to humid environments.

5. Place an Exhaust Fan

An exhaust fan is essential as it removes carbon dioxide and maintains the oxygen level in plants. Ensure that the exhaust fan is placed where the fresh air enters.

6. Keep Balanced Humidity

Hydration is as essential for plants as it is for humans. Keep a spray bottle and occasionally mist the inside of the tent containing mushrooms. Check it regularly.

7. Use of Thermometer and Hygrometer

Another important step is to monitor the mushrooms’ temperature and humidity levels; these two instruments are popular. The temperature and humidity of mushrooms depend on their species. Study their needs and requirements before growing them.

8. Install Proper Lights

Led lights must be attached to the ceiling. This will make inspection more accessible for you during nighttime.

Check out our soils for plant growth

Mushroom Grow Tent Kit

Your mushrooms need a mushroom grow tent kit, and the kind you select will significantly impact how many mushrooms you grow. Typical substrates consist of:

Straw

Straw is inexpensive and easy to prepare, and it pairs beautifully with oyster mushrooms.

Sawdust

Sawdust is perfect for shiitake mushrooms because of its high cellulose content.

Wood Chips

Sawdust is perfect for shiitake mushrooms because of its high cellulose content.

Compost

Any kind of mushroom spore that appreciates compost will work nicely with it.

Manure

Button mushrooms do nicely in a mixture of decomposing straw and manure.

Coffee Grounds

Coffee grinds are an excellent way to recycle materials and work well for small-scale farming. Pasteurization or sterilization is often necessary during substrate preparation to eliminate unwanted bacteria or fungus.

mushrooms grow tent kit

Things to Be Aware of When Making Mushroom Grow Setup

Here are the things to be aware of while making a setup for mushroom growth:

Humidity

For rapid growth, humidity and temperature must be monitored. The suitable and advisable temperature lies between 60 and 70 degrees Fahrenheit, whereas humidity should be under 60 to 80 percent. Carbon dioxide can damage mushroom growth, so sufficient airing must be provided.

Aeration

Proper ventilation is crucial to maintaining moisture and heat in a mushroom-growing setup. It prevents the production of Carbon Dioxide and hinders mold growth or pollutants, which can be highly hazardous to mushrooms. 

Lightning

Light is another essential growth unit in the life of mushrooms. To cultivate, you must choose a grow lamp with a specific light spectrum. As light is vital in their growth, you must adjust the lamp’s height as the mushrooms grow taller.

Water Controlling

Drip irrigation or growth media spraying are the two ways to regulate the water level. Water control is another consideration when cultivating mushrooms. You should water your mushrooms in the perfect amount for optimal growth. 

Insects and Diseases

Keep your safety as your number one priority. These safety measures include washing your hands after touching mushrooms and ensuring they are free of pests or diseases. Insecticides and other treatments can control fly infestations and mites, frequent pests in the mushroom industry.

Check out our support items to control humidity and temperature

Which Methods Are Best for Setting Up a Grow Tent for Mushrooms?

Different types of mushrooms have different growth requirements, so it’s essential to choose the one that is right for you!

The common names are oyster mushrooms, shiitake, and lion’s mane, which are popular indoor classes. You must research the demands of each class before growing, as their requirements might vary.

Appropriate timing is critical to guarantee the quality growth of your mushrooms. It is usually better to harvest mushrooms when the caps have opened, and the stems have grown longer.

It is a fun hobby that provides a steady supply of fresh mushrooms. With persistence and attention to detail, you can start a profitable mushroom farm in your home.

It’s critical to choose the suitable species, use the right grow light, maintain the proper humidity, heat, and airflow levels, water your mushrooms correctly, and watch for pests and illnesses in your fruits.

Picking the Right Mushroom Growing Setup

Consider your growing space, your time for growth, and your end goals when deciding which mushrooms to cultivate. Some mushrooms, like oyster and shiitake, are very beginner-friendly and forgiving.

There may be a more significant attraction for those who would like to know more about the health advantages of some fungus, such as reishi.

Whichever variety you choose, growing mushrooms has the potential to be a rewarding project that not only lets you eat fresh fruit but also produces things for your business. It can be fun to try out new varieties, which can result in the development of creative farming techniques and flavor characteristics.

Buy our soil pots for mushroom growth

Conclusion

Growing mushrooms in a tent doesn’t require a green thumb, but it can be a fun and rewarding hobby with some preparation and care. You’ll harvest your delicious mushrooms quickly with the right equipment and conditions. Remember that each mushroom species is unique, so modify your setup to suit the growing varieties.